The Curious Case of the Disappearing Multicast Packet
Many consumer and industrial devices—from home security cameras to the HDMI-over-IP extenders I investigated in a previous post—are designed as simple appliances. They often have hard-coded, unroutable IP addresses (e.g., 192.168.1.100) and expect to live on a simple, isolated network. This becomes a major problem when you need to get their multicast video or data streams from that isolated segment to users on a main LAN. My goal was to solve this with a standard Linux server, creating a simple, high-performance multicast router without a dedicated, expensive hardware box.
A Concrete Example
As a concrete example, consider this common HDMI-over-IP extender.
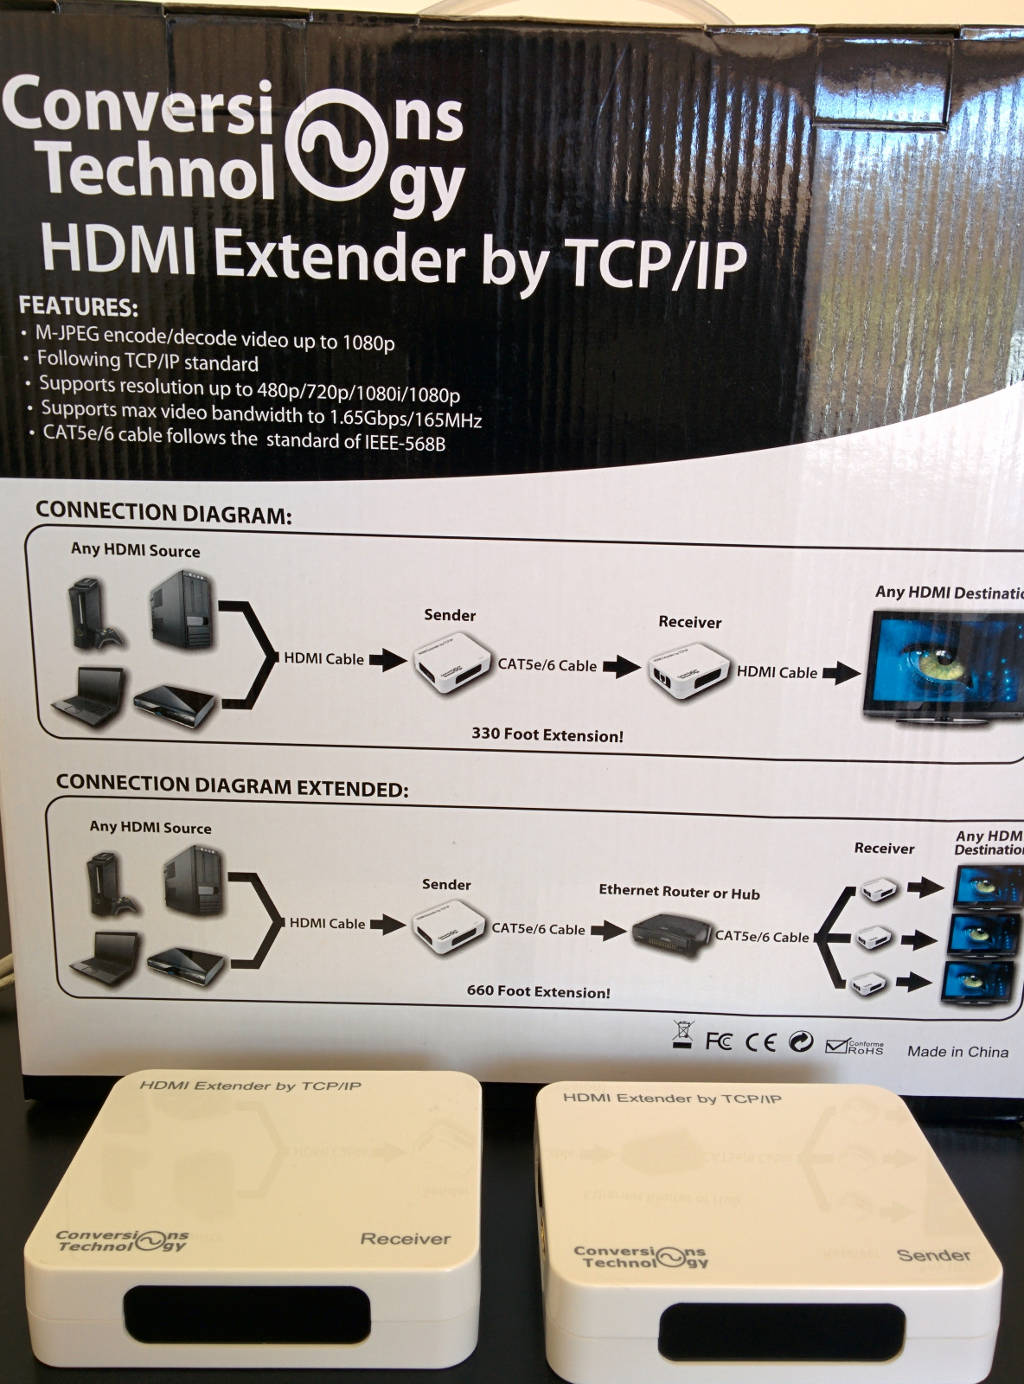
It's a simple appliance that converts an HDMI signal into a multicast UDP stream.
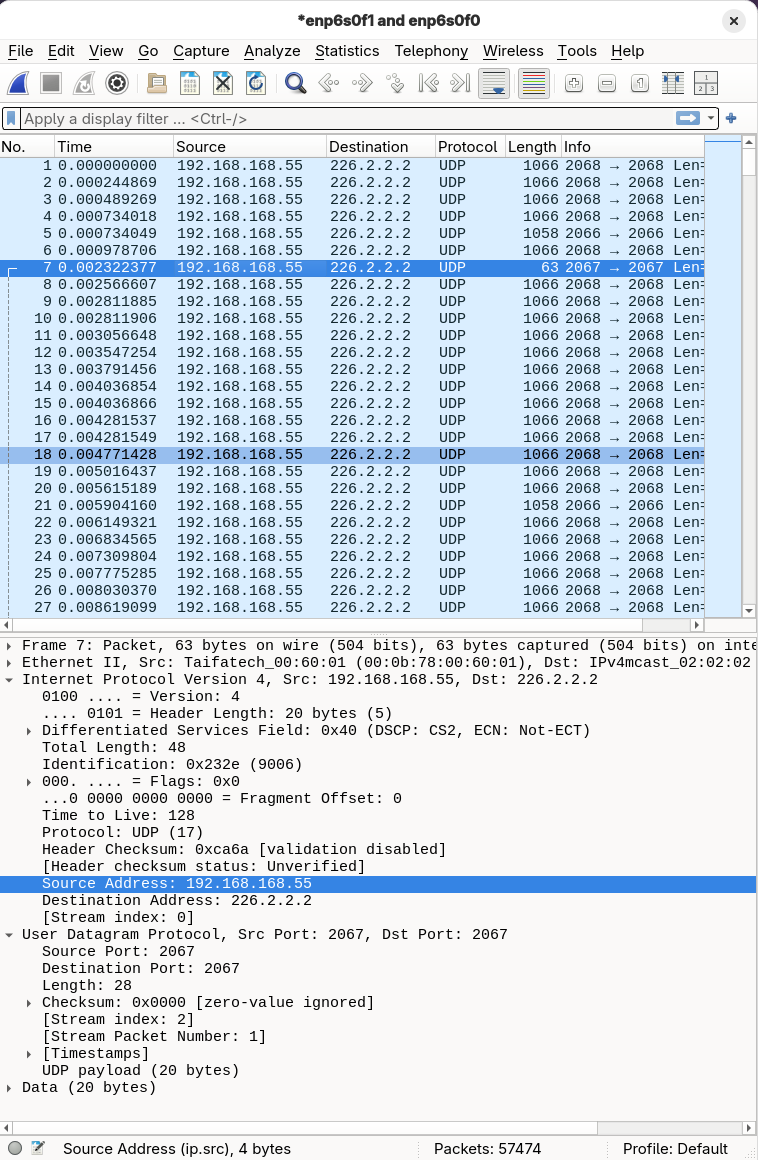
A Wireshark capture of its traffic shows that it sends packets to the multicast group 226.2.2.2 from the hard-coded, unroutable source IP address 192.168.168.55. This is the exact type of traffic we need to handle.
With that context in mind, let's dive into the technical problem.
The Problem
Can a standard Linux server act as a simple, kernel-native multicast router for devices with hard-coded, unroutable IP addresses? This article chronicles an investigation into combining nftables SNAT with direct control of the Multicast Forwarding Cache (MFC).
It's a story of methodical testing that revealed a fundamental kernel limitation, proving the initial design impossible. Yet, this same process yielded a valuable, user-friendly tool for routable multicast sources and provides a blueprint for demystifying the kernel's inner workings.
Lifting the Lid on the Black Box
My initial challenge was that the most common network observability tools were blind to the internal workings of the kernel, leaving me debugging in the dark.
Why tcpdump Isn't Enough
The first instinct for any network engineer is tcpdump. Running it on the ingress (eth0) and egress (eth1) interfaces proves the packet arrives but never leaves.
# Terminal 1: Check for packet arrival
sudo tcpdump -i eth0 host 224.1.1.1

# Terminal 2: Confirm packet absence
sudo tcpdump -i eth1 host 224.1.1.1
This confirms that the packet disappeared, but it gives no information about where or why. The entire Linux kernel network stack—a complex maze of Netfilter hooks, RPF checks, and forwarding decisions—sits between these two interfaces.
For those unfamiliar with the sheer complexity of the Linux network stack, Jan Engelhardt provides an exceptionally detailed packet flow diagram which serves as an invaluable, comprehensive map of Netfilter and the surrounding subsystems. While our investigation focuses on only a tiny portion of this map, having the full reference is essential for contextual understanding.
Choosing a Tracing Tool
Several powerful options exist, each with its own trade-offs:
- eBPF (
bpftrace,bcc): The modern, powerful answer to all your tracing needs. It allows you to write small, safe programs that can be attached to almost any kernel function. For a complex or unknown problem, eBPF is often the best tool, but it has a steeper learning curve and requires a separate toolchain. strace: For tracing system calls; useful for debugging the control plane (e.g., watching an application interact with the kernel). However, it is the wrong tool for the data plane, as a packet's journey through the kernel does not involve system calls.nftables: The obvious starting point for tracing the progress of a packet through the kernel data path. It allows us to test our hypothesis within the specific subsystem we are trying to use. Reaching for a more complex tool like eBPF would be premature if the native tool could provide the answer.
I chose to start with nftables as my primary diagnostic tool.
The Ground Truth Tool: nft monitor trace
To see Netfilter's inner workings, combine an nftables rule that explicitly flags packets for tracing with the nft monitor trace command.
Step 1: Create an Isolated Lab with Network Namespaces
Never experiment on a live system. Network namespaces are a lightweight, built-in kernel feature for creating fully isolated network stacks—perfect for a controlled lab.
# Create an isolated network namespace
sudo ip netns add ns-lab

# Create a dummy interface inside it to generate and receive traffic
sudo ip -n ns-lab link add dummy0 type dummy
sudo ip -n ns-lab addr add 192.168.100.1/24 dev dummy0
sudo ip -n ns-lab link set dummy0 up
sudo ip -n ns-lab link set lo up # Always bring up loopback
Step 2: Write a Tracing Ruleset
Create a file (e.g., trace-rules.nft) with rules that enable tracing. The key is meta nftrace set 1, which instructs the kernel to generate detailed trace events for any matching packet.
# File: trace-rules.nft
table ip filter {
  chain prerouting {
    type filter hook prerouting priority raw; policy accept;
    # For any packet coming in, turn on tracing
    iif "lo" meta nftrace set 1
  }

  chain input {
    type filter hook input priority raw; policy accept;
    iif "lo" meta nftrace set 1
  }
}
Step 3: Run the Monitor and Generate Traffic
Open two terminals. In Terminal 1, start the monitor. It will immediately begin listening for trace events in the ns-lab namespace.
# Terminal 1: Start the monitor
sudo ip netns exec ns-lab nft monitor trace
In Terminal 2, load the tracing ruleset and generate a single packet with ping.
# Terminal 2: Load rules and send a ping
sudo ip netns exec ns-lab nft -f trace-rules.nft
sudo ip netns exec ns-lab ping -c 1 192.168.100.1
Step 4: Analyze the Output
Back in Terminal 1, you'll see a verbose, unambiguous trace of the packet's journey through the Netfilter hooks, showing it passing through both prerouting and input.
...
trace id 1a2b3c4d ip filter prerouting packet: iif "lo" ...
trace id 1a2b3c4d ip filter prerouting rule iif "lo" meta nftrace set 1 (verdict continue)
...
trace id 1a2b3c4d ip filter input packet: iif "lo" ...
trace id 1a2b3c4d ip filter input rule iif "lo" meta nftrace set 1 (verdict continue)
...
This first experiment, replicated in test_nft_trace.py in the project's test suite, confirmed that nft monitor trace is the authoritative tool for observing Netfilter behavior. If a packet doesn't appear here, it was dropped before Netfilter ever saw it. This is our ground truth.
No Entry Without a Return Ticket: Proving the Order of Operations
My working theory was that the kernel performs the Reverse Path Forwarding (RPF) check after the prerouting hook. If I could prove this was true, it would mean my SNAT-based approach was at least plausible—the rule would have a chance to modify the packet before the RPF check dropped it. To move from a strong theory to an established fact, I needed an experiment to prove the exact order of operations.
Step 1: Build the RPF Test Environment
To properly test the RPF check, we need two network namespaces to simulate a source and a router. The "router" namespace (ns-router) will have the RPF check explicitly enabled, and our "source" namespace (ns-source) will send traffic from an IP address that the router considers "unroutable" via the ingress interface.
# Create the namespaces
sudo ip netns add ns-source
sudo ip netns add ns-router

# Create the virtual link (veth pair) between them
sudo ip link add veth-s type veth peer name veth-r
sudo ip link set veth-s netns ns-source
sudo ip link set veth-r netns ns-router

# Configure the source namespace
sudo ip -n ns-source addr add 192.168.1.1/24 dev veth-s
sudo ip -n ns-source link set veth-s up
# Add the "unroutable" IP. Significantly, the router will have no route back to this via veth-r.
sudo ip -n ns-source addr add 10.0.0.100/32 dev veth-s
sudo ip -n ns-source link set lo up

# Configure the router namespace
sudo ip -n ns-router addr add 192.168.1.2/24 dev veth-r
sudo ip -n ns-router link set veth-r up
sudo ip -n ns-router link set lo up

# CRITICAL: Explicitly enable RPF in the router namespace.
# We set it for all interfaces and specifically for veth-r for clarity.
sudo ip netns exec ns-router sysctl -w net.ipv4.conf.all.rp_filter=1
sudo ip netns exec ns-router sysctl -w net.ipv4.conf.veth-r.rp_filter=1
Step 2: Create a Multi-Stage Tracing Ruleset
In our ns-router, we'll install a simple nftables ruleset (rpf-trace.nft) designed to trace packets at both the prerouting and input hooks. This will tell us exactly where the packet is dropped.
# File: rpf-trace.nft
table ip filter {
  chain prerouting {
    type filter hook prerouting priority raw; policy accept;
    iif "veth-r" meta nftrace set 1
    log prefix "RPF_TEST_PREROUTING: " accept
  }
  chain input {
    type filter hook input priority raw; policy accept;
    iif "veth-r" meta nftrace set 1
    log prefix "RPF_TEST_INPUT: " accept
  }
}
Step 3: Run the Experiment
As before, open two terminals.
In Terminal 1, start nft monitor trace in the ns-router namespace.
# Terminal 1
sudo ip netns exec ns-router nft monitor trace
In Terminal 2, load the rpf-trace.nft ruleset into ns-router, and then send a multicast packet from ns-source using the unroutable source IP (10.0.0.100).
# Terminal 2
sudo ip netns exec ns-router nft -f rpf-trace.nft
sudo ip netns exec ns-source nc -u -s 10.0.0.100 -w 1 224.1.1.1 12345 <<< "test_multicast_data"
Step 4: Analyze the Result - The Smoking Gun
The nft monitor trace output in Terminal 1 is the definitive proof. You will see the packet successfully reach and pass through the prerouting hook in detail:
trace id 9a62f969 ip filter prerouting packet: iif "veth-r" ether saddr 7a:49:78:11:81:4f ether daddr 01:00:5e:01:01:01 ip saddr 10.0.0.100 ip daddr 224.1.1.1 ip dscp cs0 ip ecn not-ect ip ttl 1 ip id 32397 ip length 37 udp sport 54478 udp dport 12345 udp length 17 udp checksum 60296
trace id 9a62f969 ip filter prerouting unknown rule handle 3 (verdict continue)
trace id 9a62f969 ip filter prerouting policy accept
# --- ABSOLUTE SILENCE AFTER THIS POINT ---
Notably, there was no trace from the input hook. This was the empirical evidence I needed: the packet was undeniably seen by prerouting, but it was dropped before it could reach input.
This experiment, replicated in test_rpf_failure.py in the project's test suite, confirms the operational order: the RPF check occurs after the prerouting hook but before the input hook. This was a critical finding. It meant an SNAT rule in prerouting would have a chance to modify the packet before the RPF check could drop it.
However, this is where the investigation hit an architectural wall.
No Translations for Fairies: Why Multicast NAT is Impossible
With the RPF check's position confirmed, my next step was to implement an nftables SNAT rule in the prerouting hook. The intent was to change the unroutable source IP to a routable one, allowing the packet to pass the RPF check and be forwarded.
# Attempted SNAT rule (Spoiler: This fails!)
table ip nat {
  chain prerouting {
    type nat hook prerouting priority -150; policy accept;
    iif "veth-r" ip saddr 10.0.0.100 ip daddr 224.1.1.1 snat to 192.168.1.2
  }
}
However, when I tried to load this rule, the nft command failed instantly with a cryptic but absolute error: "Error: Operation not supported." The kernel rejected my rule outright.
This wasn't a packet drop; it was an architectural "no." The reason: a fundamental design choice within the Linux kernel's Netfilter framework. All NAT operations depend on the connection tracking subsystem (conntrack). conntrack is responsible for maintaining state about network connections, which is essential for translating addresses consistently. Multicast, by definition, is a one-to-many, connectionless protocol, and the concept of a "connection" simply doesn't apply. Importantly, the kernel's conntrack code contains an explicit check that refuses to create a tracking entry for any incoming multicast packet. Therefore, without conntrack, NAT cannot be performed on incoming multicast packets.
This is the architectural dead end. The Linux kernel's Netfilter architecture makes the goal of SNAT'ing an incoming multicast packet in the prerouting hook fundamentally impossible. The kernel isn't being difficult; it's enforcing sound internal logic.
Direct MFC Control: The Other Half of the Puzzle (and the Two-API Reality)
My original plan to handle unroutable multicast involved two main components: nftables SNAT (which I proved impossible) and direct control over the kernel's Multicast Forwarding Cache (MFC). While the SNAT part failed, the investigation into MFC control itself yielded unexpected insights, revealing what we call the "Two-API Reality."
This section details how to directly command the kernel's multicast forwarding table. However, for routable multicast sources, direct MFC control provides a powerful and precise way to statically route traffic without the overhead of dynamic routing protocols like PIM.
The Ground Truth: Direct MFC Programming in C (setsockopt)
The file mfc_c_test.c provides a working reference implementation in C. It shows the precise sequence of system calls needed to program the kernel's MFC directly. This code is the empirical proof that this method works.
// Abridged example from mfc_c_test.c - Demonstrates direct MFC programming

#include <stdio.h>
#include <stdlib.h>
#include <string.h>
#include <unistd.h>
#include <errno.h>
#include <sys/socket.h>
#include <netinet/in.h>
#include <arpa/inet.h>
#include <linux/mroute.h> // Contains MRT_INIT, MRT_ADD_VIF, etc.

void die(const char *s) {
    perror(s);
    exit(1);
}

int main(int argc, char *argv[]) {
    // ... (argument parsing and setup) ...

    // 1. Get a special raw socket for IGMP protocol
    int sock = socket(AF_INET, SOCK_RAW, IPPROTO_IGMP);
    if (sock < 0) die("socket");

    // 2. Tell the kernel you want to control multicast routing (MRT_INIT)
    if (setsockopt(sock, IPPROTO_IP, MRT_INIT, &(int){1}, sizeof(int)) < 0) die("setsockopt MRT_INIT");

    // 3. Create a Virtual Interface (VIF) for the input interface (VIF 0)
    struct vifctl vc_in;
    memset(&vc_in, 0, sizeof(vc_in));
    vc_in.vifc_vifi = 0; // Assign VIF index 0
    vc_in.vifc_flags = VIFF_USE_IFINDEX; // Use interface index
    vc_in.vifc_lcl_ifindex = atoi(argv[1]); // Input interface index
    if (setsockopt(sock, IPPROTO_IP, MRT_ADD_VIF, &vc_in, sizeof(vc_in)) < 0) die("setsockopt MRT_ADD_VIF 0");

    // 4. Create a VIF for the output interface (VIF 1)
    struct vifctl vc_out;
    memset(&vc_out, 0, sizeof(vc_out));
    vc_out.vifc_vifi = 1; // Assign VIF index 1
    vc_out.vifc_flags = VIFF_USE_IFINDEX; // Use interface index
    vc_out.vifc_lcl_ifindex = atoi(argv[2]); // Output interface index
    if (setsockopt(sock, IPPROTO_IP, MRT_ADD_VIF, &vc_out, sizeof(vc_out)) < 0) die("setsockopt MRT_ADD_VIF 1");

    // 5. Create the Multicast Forwarding Cache (MFC) entry
    struct mfcctl mfc;
    memset(&mfc, 0, sizeof(mfc));
    mfc.mfcc_origin.s_addr = inet_addr("192.168.1.1"); // The routable source IP
    mfc.mfcc_mcastgrp.s_addr = inet_addr("224.1.1.1"); // The multicast group IP
    mfc.mfcc_parent = 0;                               // Input is VIF 0
    mfc.mfcc_ttls[1] = 1;                              // Set TTL > 0 for output VIF 1
    if (setsockopt(sock, IPPROTO_IP, MRT_ADD_MFC, &mfc, sizeof(mfc)) < 0) die("setsockopt MRT_ADD_MFC");

    printf("[C Tool] SUCCESS: VIFs and MFC entry added. Holding for 10s...\n");
    sleep(10); // Keep the socket open to maintain the route

    // ... (cleanup) ...
    return 0;
}
The User-Friendly Solution: pymfcd
While C provides the "ground truth" for direct kernel interaction, writing and maintaining C daemons for every static multicast routing scenario is cumbersome. To make this correct approach more accessible, we created pymfcd, a Python-native daemon and command-line tool, as a direct result of this investigation. The project is now available on GitHub: https://github.com/acooks/pymfcd.
pymfcd abstracts away the complexities of the setsockopt API and the manual management of Virtual Interfaces (VIFs). The daemon automatically handles VIF creation and reference counting when you add or remove MFC rules, allowing you to work directly with familiar interface names. It provides a clear, straightforward way to manage static multicast routes, making a complex kernel interaction simple to understand and use.
The run_experiment_instructive.py script in this project demonstrates how to orchestrate this, but the core operation is a single, simple command. To solve the problem of statically routing our routable multicast source, you would:
# 1. Ensure the pymfcd daemon is running in the background within our router namespace.
#    (The PYTHONPATH is crucial here, pointing to the vendored library location.)
sudo ip netns exec ns-router env PYTHONPATH=./mcast_lab/src/pymfcd_vendored \
    python3 -m pymfcd.daemon_main &

# 2. Add the forwarding rule with a single, declarative command.
#    The daemon handles creating VIFs for veth-r and eth1 automatically.
sudo ip netns exec ns-router env PYTHONPATH=./mcast_lab/src/pymfcd_vendored \
    python3 -m pymfcd.mfc_cli mfc add \
    --iif veth-r \
    --oifs eth1 \
    --group 224.1.1.1 \
    --source 192.168.1.1
This single command achieves the goal. The kernel is now explicitly instructed to forward the packets, demonstrating a much cleaner and more robust way to manage static multicast routes compared to writing a custom C daemon.
Limitations and Architectural Alternatives
The direct MFC programming approach detailed here is a powerful and precise solution for its intended use case: statically forwarding multicast from a known, routable source to a limited number of subnets or VLANs. However, it's important to understand its boundaries and to know when a different architectural approach is required.
The Kernel's Hard Scaling Limit: MAXVIFS=32
The native Linux multicast forwarding engine, which our pymfcd solution controls, has a hard-coded, compile-time limit of 32 Virtual Interfaces (VIFs). Each MRT_ADD_VIF call consumes one of these VIFs. This makes the solution perfectly adequate for a router connecting a few dozen interfaces, but it is an architectural dead-end for scenarios requiring high interface density, such as in a data center switch or a large broadcast facility.
Architectural Alternative 1: Modern Data Planes (OVS & EVPN)
When you hit the MAXVIFS scaling wall, the industry-standard solution is to move away from the native kernel forwarding plane to a more advanced data plane.
- Open vSwitch (OVS): OVS implements its own highly-optimized forwarding path in the kernel. For multicast, it uses "Group Tables" to efficiently manage multicast replication, completely bypassing the kernel's native MFC and its limitations.
- EVPN (Ethernet VPN): In modern data center fabrics, EVPN provides a control plane for managing network tunnels. Its approach to multicast, known as Ingress Replication, is to convert a multicast stream into a series of unicast packets at the first-hop switch (the "ingress"). These unicast packets are then sent through the network to each destination, where they can be converted back to multicast if needed.
Architectural Alternative 2: The Userspace Multicast Relay
A different approach to the original "unroutable source" problem is to handle it at the application layer. A userspace multicast relay is a program that:
- Receives: It joins the problematic multicast group (e.g., 224.1.1.1 from source 10.0.0.100) just like any other multicast client.
- Retransmits: It takes the data from that stream and immediately retransmits it as a new multicast stream, but this time sourced from a clean, routable IP address on the router itself (e.g., a loopback address).
This "launders" the stream. The newly transmitted multicast is now fully compliant with RPF checks and can be easily integrated into a standard multicast routing environment that uses protocols like PIM, without requiring any direct manipulation of the kernel's MFC.
Conclusion: Mapping Kernel Boundaries and Forging New Tools
This investigation began with a clear goal: build a simple, kernel-native static multicast router for non-compliant sources. The methodical process of testing that goal was a success, as it definitively proved the initial SNAT-based design is architecturally impossible. This finding prevents future effort on an unworkable path and clarifies the need for alternative architectures, like a userspace relay.
The key outcome was the deep dive into the MFC, which led to the creation of pymfcd. This user-friendly tool solves the common, real-world problem of statically routing routable multicast sources. Ultimately, the project succeeded by rigorously mapping a kernel boundary, delivering a practical tool, and providing a blueprint for approaching similar low-level system investigations.